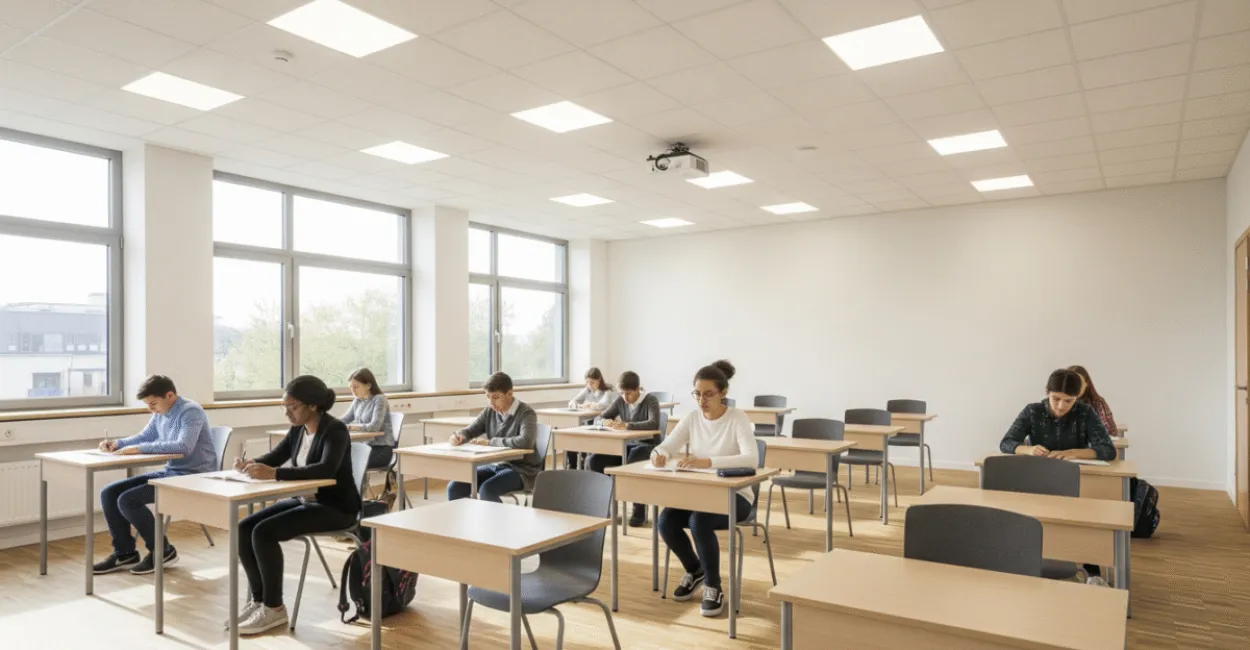
Glare on a whiteboard, shadowy desks, and harsh lights can make reading tiring, even when a room seems bright. Classroom lighting works best when it combines controlled natural light with well-spaced fixtures, provides the right intensity for each task, limits reflections on screens and whiteboards, and can be adjusted throughout the day. No single bulb or color temperature works for every space. The room’s size, window placement, activities, and the needs of students should guide your choices.
Before replacing equipment, check where the light falls and where shadows or uncomfortable glare appear. This often reveals simple adjustments, such as moving desks or adjusting blinds, that can help before you make a larger investment.

Key takeaways
- A well-lit room has even light across desk surfaces, without very bright areas next to dark zones.
- Blinds and curtains should reduce direct sunlight without blocking all natural light.
- A color temperature between 4000 K and 5000 K may work for study activities, but it should be considered alongside comfort and fixture quality.
- Light meters can measure illuminance; phone apps are only rough guides.
- Watts indicate electricity use, not how much light reaches a desk or work surface.
What is the ideal lighting for a classroom?
Ideal classroom lighting provides enough even light on reading and writing surfaces, limits glare, and allows sunlight to be controlled. The right choice depends on the space, natural light, activities, and applicable standards for the project; assess the whole setup, not just bulb wattage. For an initial assessment, check whether students can read the whiteboard from different seats, whether screens have reflections, and whether students can write without casting a shadow over their notebooks. Lighting should work for desks, walkways, and the board. In rooms used for presentations, it also helps to be able to dim one area without darkening the entire room.
- Observe the room in the morning and afternoon, when the sun’s position changes.
- Check the room with fixtures on and off, looking for dark spots, flickering bulbs, and direct glare in the field of view.
- Check whether desks near the windows have lighting conditions similar to those at the back of the room.
- Note the activities that take place in the room: reading, writing, hands-on projects, presentations, or computer use.
NR 17, issued by Brazil’s Ministry of Labor and Employment, addresses workplace ergonomics and includes requirements for lighting conditions during work activities. It is not a standard specifically for classrooms; it can serve as an ergonomics reference, but school projects must also consider relevant technical and safety requirements. ABNT NBR ISO/CIE 8995-1 covers lighting in work environments, and Fundacentro, Brazil’s occupational safety and health foundation, publishes technical resources on workplace lighting and visual comfort.
A classroom works best when light reaches the task without competing with what students need to see.
Natural light: making the most of windows and controlling sunlight
Natural light reduces the need for artificial lighting during the day, but direct sunlight on desks, whiteboards, or screens can cause glare and heat up the room. The solution is usually to control incoming light, not block the windows completely. Observe the sun’s path before deciding where to place desks. When light comes in from the side, it can cast shadows on notebooks or create reflections on the whiteboard. Blinds, sheer curtains, and exterior sunshades can soften the glare; adjust them so the room stays bright without exposing students to direct sunlight.
Light-colored surfaces can help spread light, as long as they are not glossy. A white wall with a highly reflective finish can create bright spots; matte finishes tend to reduce this problem. Mirrors are rarely the first choice in a classroom because they can direct glare toward people’s eyes or screens.
In a room with two areas, such as a reading corner and a group activity space, natural light may benefit each area differently. Place reading-intensive tasks where the lighting is steady, and use curtains to limit sunlight in areas near the windows.
Artificial light: fixtures, color, and color rendering

General lighting should cover the room evenly; task lighting can supplement specific areas, such as an activity table. The best study light is one that illuminates the surface without creating direct glare or harsh shadows—not necessarily the most powerful one. Color temperature describes the appearance of light in kelvins. For reading and schoolwork, 4000 K to 5000 K is a commonly considered range, but perception varies and this is not a universal rule: some people may find overly cool light harsh, while warmer light may suit activities with lower visual demands.
The color rendering index (CRI) indicates how accurately a light source renders colors compared with a reference. For educational materials, maps, and art projects, it makes sense to choose fixtures with a CRI above 80, while also checking product quality and light uniformity. Good color rendering alone does not fix glare or uneven distribution.
LEDs offer options for energy use and control, but savings depend on equipment efficiency, operating hours, installation, and the controls used. Sensors can be useful in walkways; in occupied classrooms, accessible controls let you adjust the lighting without leaving students in the dark during presentations. LED strips are one installation option, not an automatic solution for every project.
When comparing products, don’t look at wattage alone. A 12 W bulb indicates approximate energy use, but it doesn’t determine illuminance at desks: that also depends on light output, optics, mounting height, spacing, and room surfaces.
How to distribute lighting and avoid shadows and glare
Distributing classroom lighting means positioning fixtures so light reaches desks without creating pronounced shadows or reflections on the whiteboard. In general, a regular grid of ceiling fixtures helps create uniform light, but the results depend on ceiling height, room shape, and window placement.
A common mistake is to install a single row of fixtures down the center without considering where students sit. Those directly under a bright source may experience excessive glare, while desks along the sides remain dim. Check the room from a seated person’s point of view, not just by looking at the ceiling.
On glossy whiteboards and screens, reflections often appear when a light source lines up with the surface and viewing angle. Moving the fixture, screen, or desks may solve the problem more cheaply than replacing the entire system. An LED strip can be integrated into the architecture, but its position and diffusion should prevent visible lines of light from appearing in the field of view.
Even lighting starts with the placement of tasks and people, not the design of the ceiling.
How lighting affects attention, comfort, and inclusion
Light affects visual comfort and the conditions for staying engaged with a task, but it cannot, by itself, guarantee better attention or learning. Glare, noticeable flicker, and strong contrasts can make it harder to keep your eyes on the material, especially during extended activities.
Students with light sensitivity, migraines, or attention difficulties may respond differently to the same environment. When possible, offer alternative seating, control window glare, and avoid abrupt transitions between very bright and very dark areas. Individual responses matter: a setup that is comfortable for most people may still bother someone.
For information about occupational risks and visual comfort at work, the NIOSH – CDC offers technical resources. The relationship between lighting and sleep also depends on the time of day, duration of exposure, and individual characteristics; a specific color temperature should not be treated as a clinical solution.
A well-lit environment supports health and comfort, but it does not replace an individual assessment when symptoms persist. If headaches or visual discomfort recur, note when they happen and seek appropriate professional advice.
How to measure and assess classroom lighting
To measure lighting, use a light meter and take readings at the work surface, roughly at the height of notebooks or other materials. Illuminance is measured in lux and indicates how much light falls on a surface; one reading alone cannot tell you whether a room is comfortable or meets all requirements.
Take measurements at several points, including desks near the windows, the center, and the back of the room. Repeat the process with natural and artificial light under typical conditions. Phone apps can help identify large differences between areas, but phone sensors are not calibrated instruments, and their results do not replace a technical measurement.
The table can help turn everyday observations into testable hypotheses. Before buying new fixtures, check whether the problem changes when you adjust the curtains, move a desk, or turn on another lighting circuit.
Observed sign Possible cause Recommended action Reflection on the whiteboard or screen Light source or window reflected in the field of view Adjust blinds and try a different position for the fixtures, screen, or desks One row of desks is darker Uneven distribution or a fixture that is off Check the bulbs and take measurements at different points on the work surface Hand shadow on a notebook Light coming from behind or from the wrong side for the task Reconsider the desk position and direction of supplemental lighting Uncomfortable glare when looking up Exposed fixture or intense source in the field of view Use an appropriate diffuser, change the angle, or reposition the fixture Flickering or changing light levels Faulty bulb, driver, or connection Request an inspection and replace faulty components
To learn more about lighting, compare your measurements with the project specifications and applicable technical references. Recommendations depend on the activity, installation, and standard being used; an app or generic table does not certify compliance.
Implementation, maintenance, and cost checklist
Start with lower-cost fixes: clean diffusers, replace faulty bulbs, adjust blinds, and rearrange desks where glare occurs. Only then consider replacing fixtures or installing new circuits. This approach helps you avoid buying equipment before identifying the cause of the discomfort.
- Low cost: cleaning, replacing burned-out bulbs, adjusting curtains, and trying new desk locations.
- Moderate intervention: replacing fixtures with unsuitable light distribution, installing zone controls, or adding compatible diffusers.
- Technical project: reconfiguring the fixture layout, reviewing circuits, and having a qualified professional inspect the electrical installation.
Include checks for flickering bulbs, dirty diffusers, sensor failures, and changes to the room layout in your routine. The sun’s position changes throughout the year, so blinds that work well at one time may need to be readjusted in another season.
The general recommendations in this article do not replace regulatory requirements, project specifications, or a technical assessment. Consult NR 17, ABNT NBR ISO/CIE 8995-1, and Fundacentro resources based on the activity and type of space. When reviewing strategies to improve attention and increase focus in the classroom, also consider educational and environmental factors beyond lighting.
The next step is to observe the room at different times, note areas with glare and shadows, and measure illuminance at several desks. With these records, it’s easier to decide whether adjusting the curtains and layout is enough or whether you need to request a lighting design.
Frequently asked questions
What color temperature should I choose for studying?
A range of 4000 K to 5000 K may work well for reading and writing, but it isn’t a rule for everyone. Consider users’ comfort, natural light, and fixture quality.
Can a 12 W bulb light a classroom?
You can’t tell from wattage alone. Wattage indicates energy use; the light reaching desks also depends on light output, optics, mounting height, and the number of fixtures.
Is an LED strip suitable for every classroom?
No. It can be used in some projects, but its diffusion and placement must prevent direct glare and reflections. Check light distribution at desk level.
Can I use a phone app to measure lux?
Yes, as an initial estimate, especially for comparing areas in the same room with the same device. To assess compliance or make technical decisions, use an appropriate light meter and, if needed, get a professional assessment.
Artigos Relacionados
 How to Include Students with Disabilities in the General Education Classroom
 School Health: How Schools Promote Student Well-Being
 Classroom Layouts: Models and Practical Examples
 How to Motivate Adult Education Students to Keep Studying
 The Classroom of the Future: Emerging Technologies Transforming Education
 Brazil’s LGPD in Schools: Protecting Student, Family, and Staff Data